How to deploy WordPress on Kubernetes using Gitlab
This tutorial will guide you in deploying and running the code of your WordPress site on the Bitpoke App using Gitlab.
This tutorial assumes you’ve created a site on Bitpoke App and will guide you in how to store and deployour site code on Bitpoke App from a Gitlab repository(public or private).
To follow this tutorial, you’ll need a GitLab account and access to your site code repo or archives of wp-content/themes and wp-content/plugins and possible additional folders containing custom code. The site to be installed is using a repository called mysite with a slightly customized layout.
1. Create a repository on GitLab
You’ll need to store your code on your own GitLab repository and you can boot-strap it with the Bitpoke
Stack example repo
as a starting point. To do so, you would need to click the New Project button and select the Import project option in the wizard. Then click the Repository by URL.
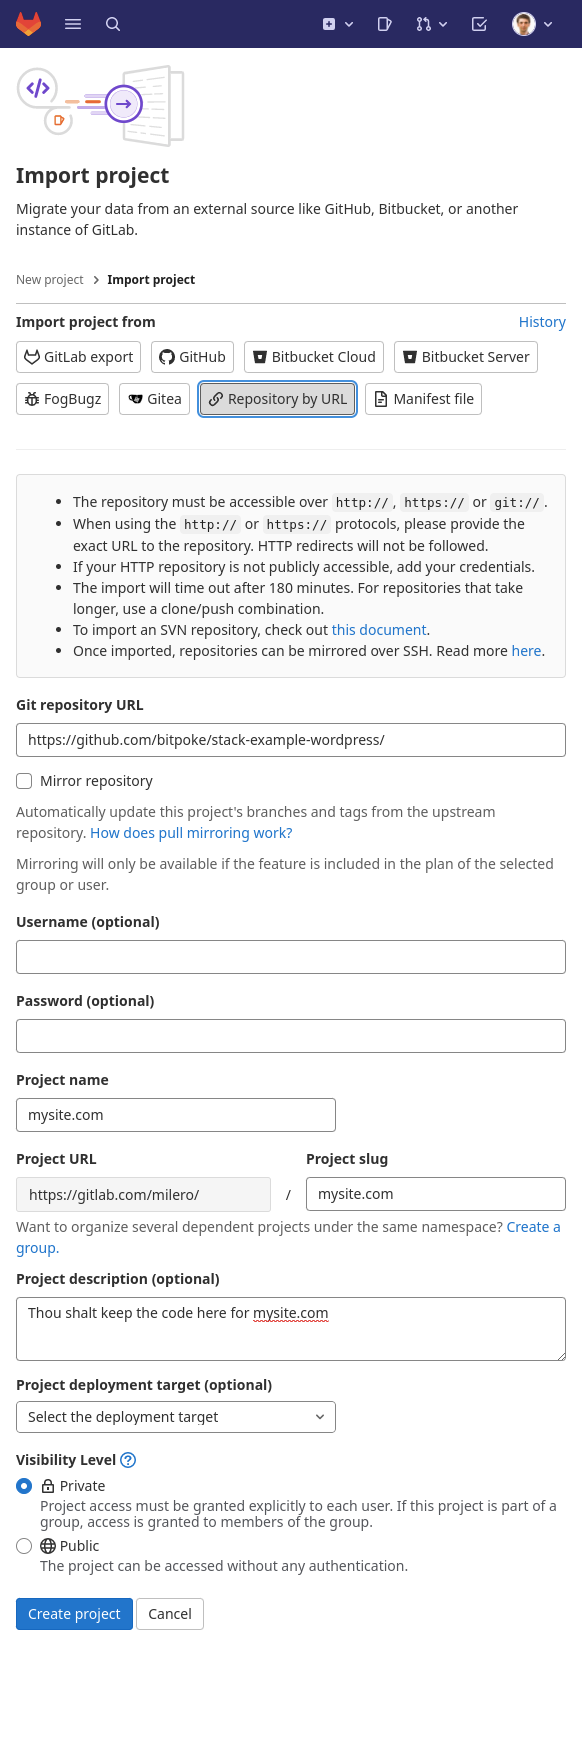
In the Git Repository URL enter https://github.com/bitpoke/stack-example-wordpress/. Leave unchecked the Mirror repository select. Fill in the Project slug with the name of your site. You also do not need to select Project deployment target(optional).
All done, so now you should complete the form by hitting the Create project button. In a few seconds, you’ll get your site code layout completed.

2. Configure the CI/CD for the project
Next we need to configure the continuous integration and deployment for the site. This is possible via the Project menu, section Settings -> CI/CD.
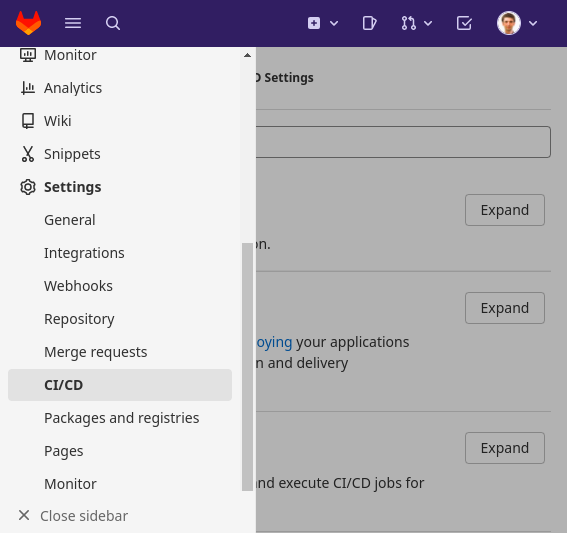
Scroll to Variables section and click Expand. Now you should see the Add variable button so you can click it to add the required variables to connect to your Google Cloud setup.
The variables that need to be entered are:
GOOGLE_CLOUD_ZONE
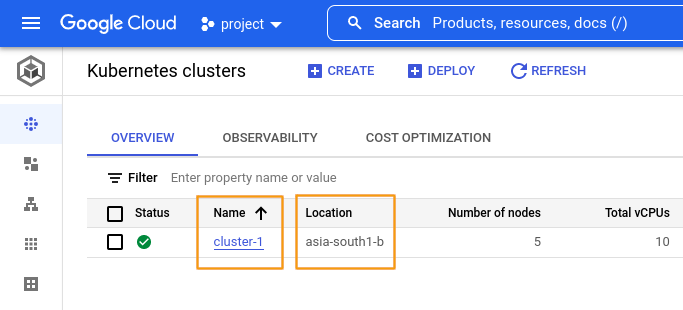
If you forgot the GCP zone your Kubernetes cluster is living, you can find it in the cluster overview page in Google Cloud Console
here
. The value in our sample is asia-south1-b, you’ll find yours under the Location column.

GOOGLE_KUBERNETES_ENGINE_CLUSTER
The value of this variable can be extracted from the cluster listing page under the column Name. In our case, it’s cluster.
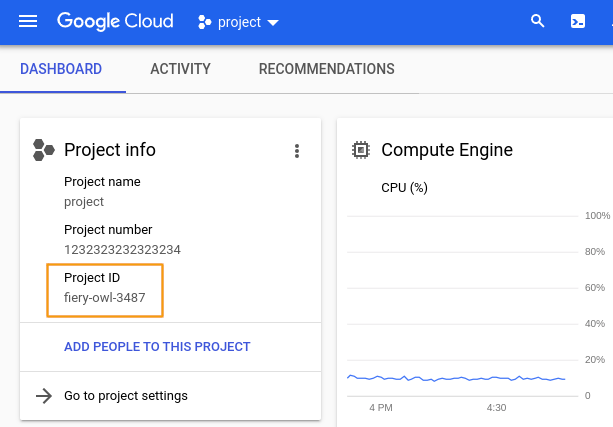
GOOGLE_CLOUD_PROJECT
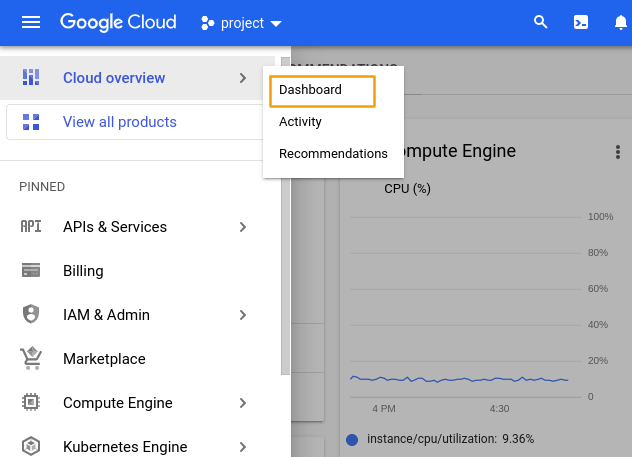
You can find this value in the Google Cloud Console, in the Cloud overview -> Dashboard, accessible from the top left main menu.
The default format of the value is similar to fiery-owl-3487 and you can find it in the Project Info card, entry Project ID.
GCR_IMAGE
The value can be set to gcr.io/fiery-owl-3487/mysitecom, using the GCP project value identified above.
BITPOKE_PROJECT:
This value is easy to spot directly in the Bitpoke App, in the selected site Routing menu. It is listed under the Kubernetes Project Namespace. In our case it’s proj-zfamo5.
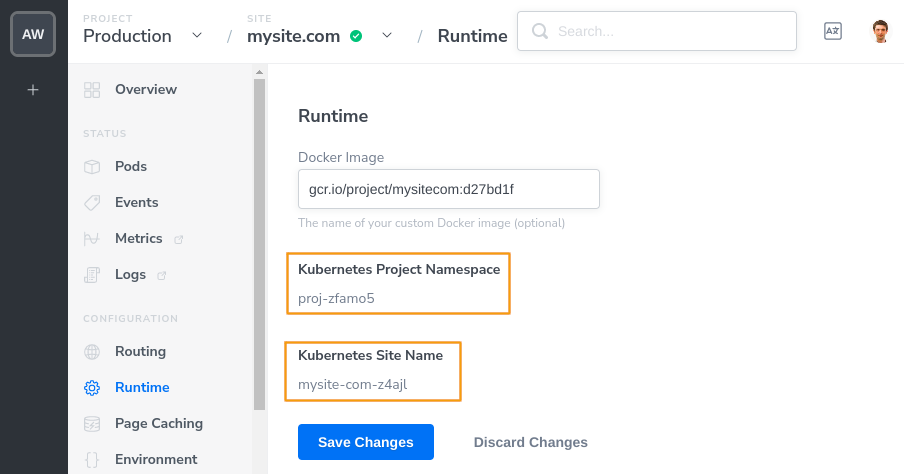
BITPOKE_SITE_NAME
The value for the Bitpoke Site Name can be found in the same Runtime screen of the Bitpoke App, under the Kubernetes Site Name label. It’s mysite-com-z4ajl for our sample site.
3. Set up application key
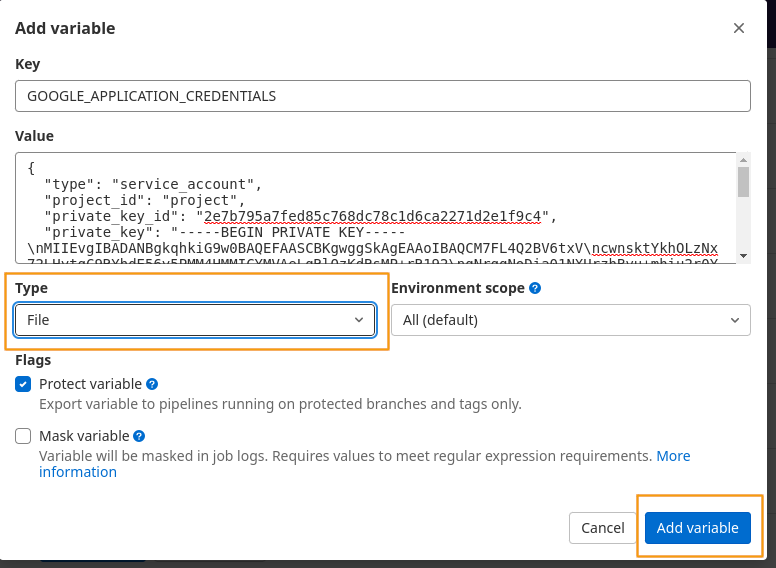
We will need to add a special variable typed File containing a JSON access key. The name of the variable will be GOOGLE_APPLICATION_CREDENTIALS. This will take a few easy steps, detailed below.
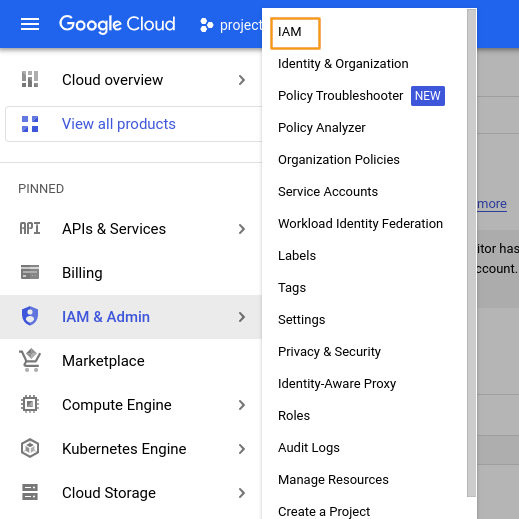
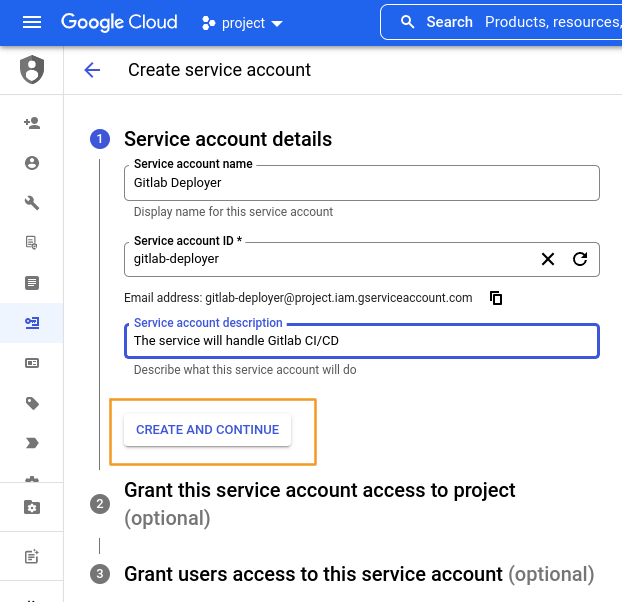
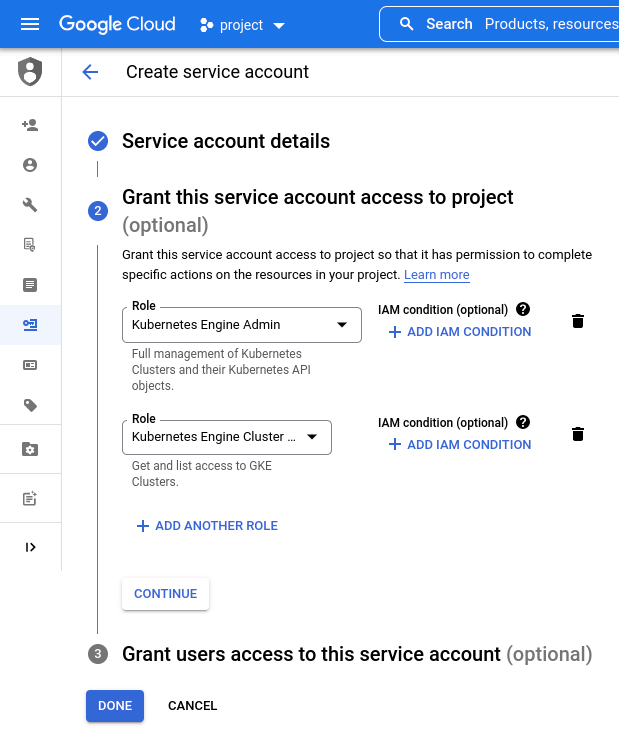
The first step is to create a service account in the Google Cloud Console, in the IAM Admin -> Service Accounts menu. Fill in a relevant name, such as GitLab deployer. Then press Continue. Grant Kubernetes Engine Admin and Kubernetes Engine Cluster Viewer. Click on the Done button finally.

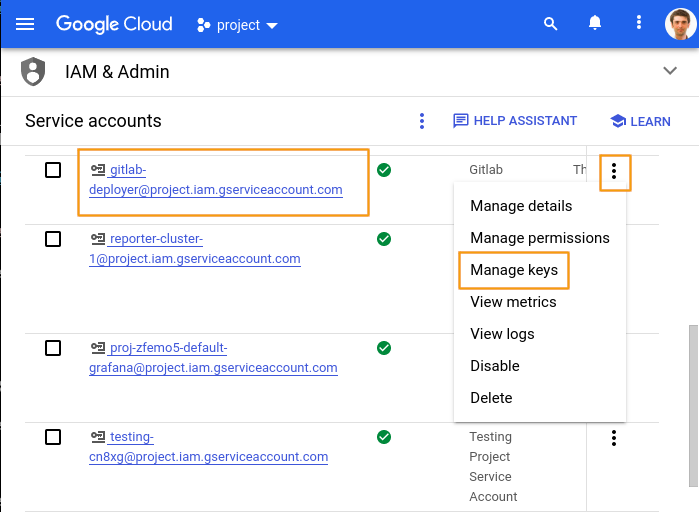
Second step is to generate the access key. You need to click on the triple vertical dots of the service account Actions column and then click Manage keys.
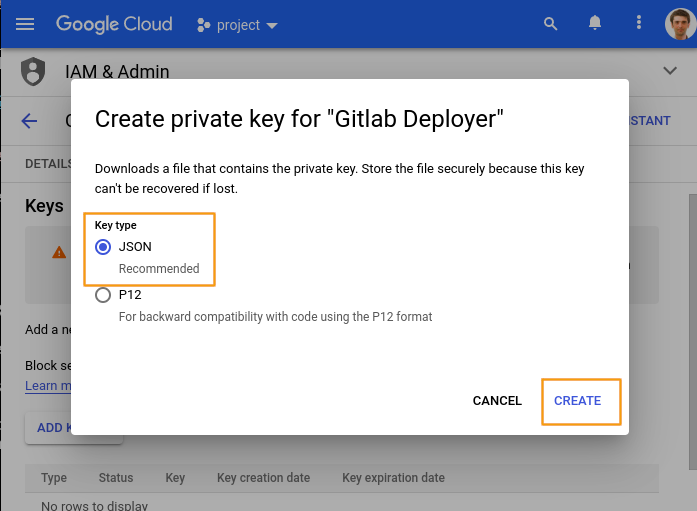
Click the Add Key button and select Create new key. Select JSON as Key type and press Create. You will be able to download the private key to your computer.
Open the key content with your text editor and copy the content of the key. Now it’s the moment to create in GitLab the new variable named GOOGLE_APPLICATION_CREDENTIALS and assign it to type File. Make sure to paste the key in the Value text input. Click Add Variable and you are done.
4. Grant bucket write permissions
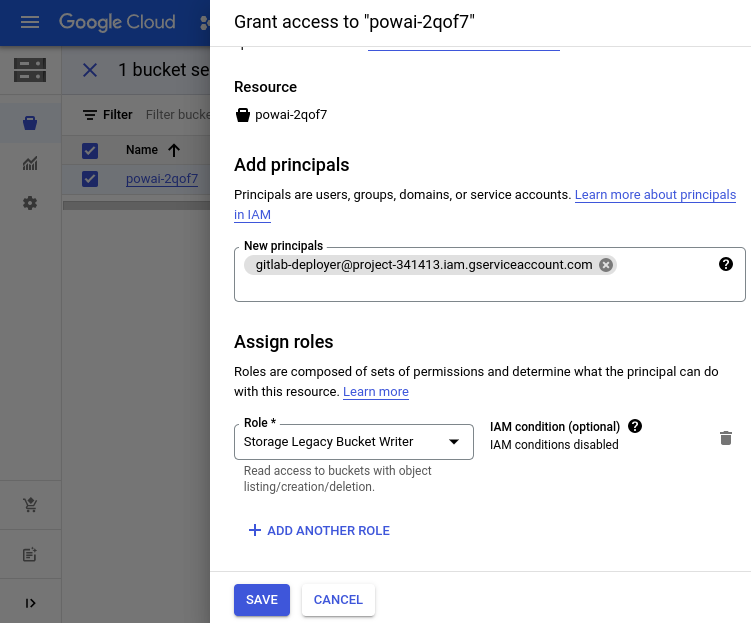
The last step is to grant write permissions so that the generated Docker image can be stored. For this, you’ll need to assign write rights to the Gitlab deployer - the service account that you have just created in the first step.
You’ll have to visit the Cloud Storage->Buckets menu. Select the appropriate storage bucket from the list and then click on the Permissions button.
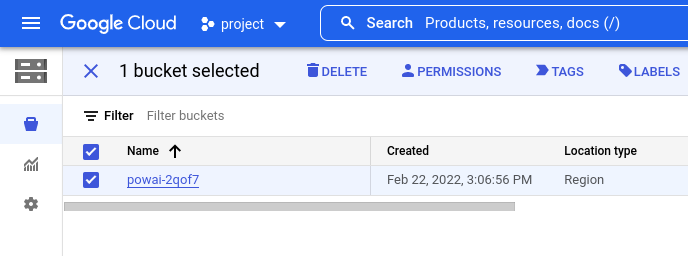
Add in the New principals input the service account and in Role select Storage Legacy Bucket Writer. Click Save and you are all good to use your new GitLab deployment pipeline!